Creating Your First Advertiser
- Details
Now that you've created your first Advertising Zone, it's time to create your first Advertiser.
An Advertiser represents the person, company, or organization that owns one or more advertising campaigns. Every Campaign and every Advertisement belongs to an Advertiser, making this one of the core building blocks of WaypointAds.
If you completed the Learning Setup, you'll already see the Waypoint Outfitters – Learning Example advertiser in the list on the right. This example demonstrates what a completed Advertiser looks like. You may leave it in place, edit it, or delete it whenever you no longer need it.
Now let's create your own Advertiser.
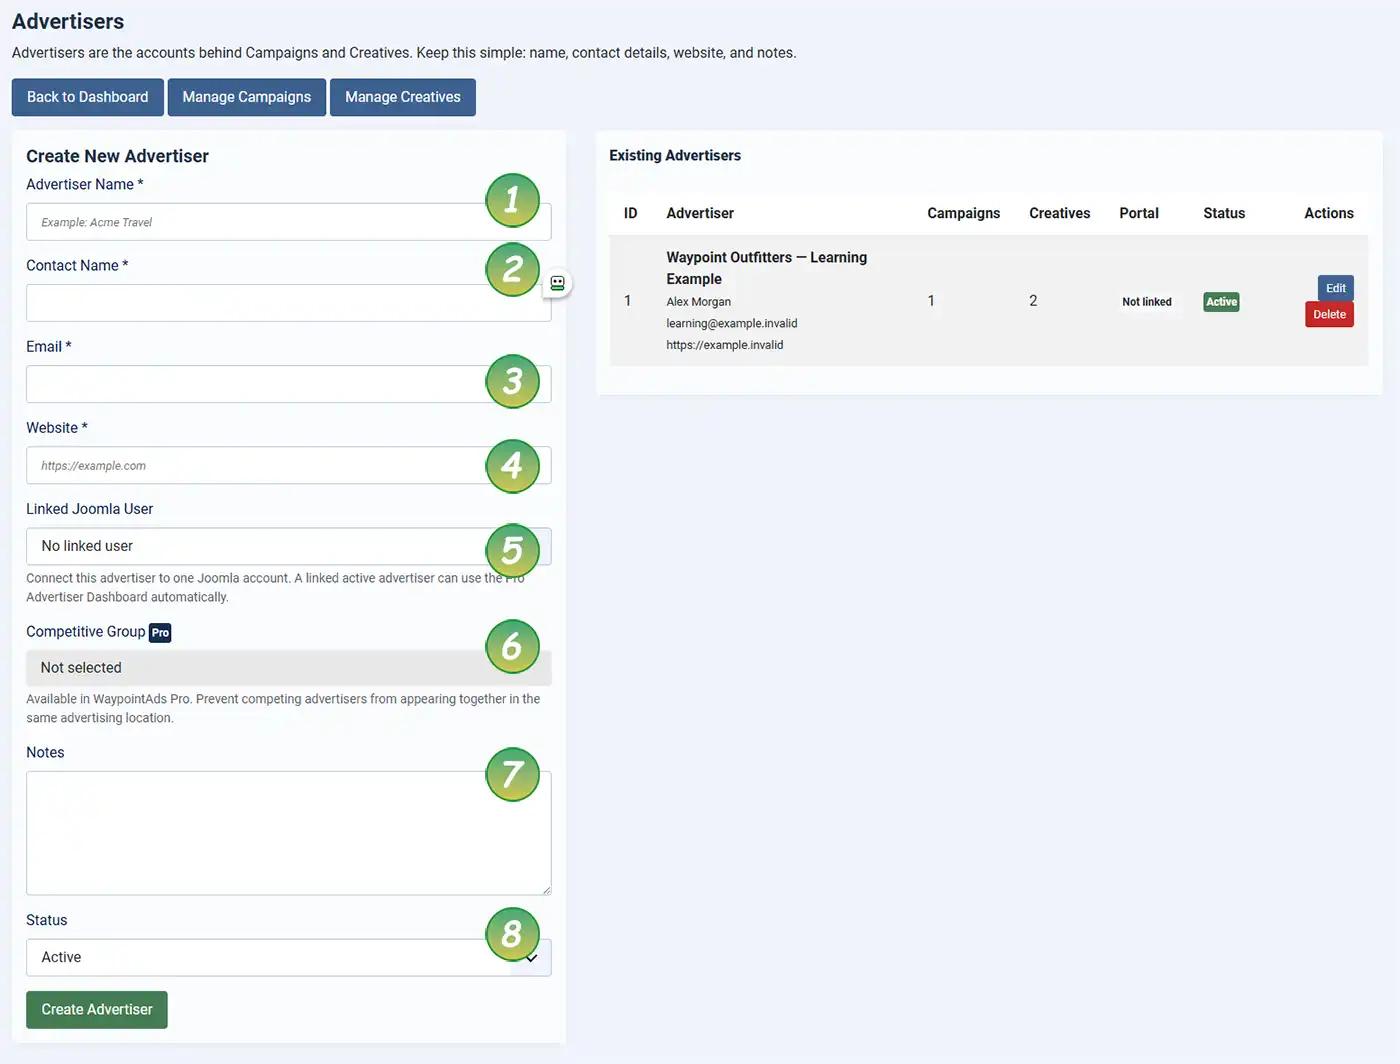
Advertiser Settings
Complete the fields below using the numbered guide.
1. Advertiser Name
Enter the name of the company or individual purchasing the advertising.
Examples include:
- John's Auto Repair
- Acme Travel
- Smith Insurance
- Local Garden Center
Choose a descriptive name that will be easy to recognize when managing multiple advertisers.
2. Contact Name
Enter the name of the person you normally communicate with regarding advertising.
This person will receive correspondence, approvals, and account-related communications.
3. Email
Enter the advertiser's primary email address.
This address is used for communication and, in the Commercial Edition, may also be used with the Advertiser Portal.
4. Website
Enter the advertiser's website address, including https://.
This provides a quick reference and is also used when creating advertising campaigns.
5. Linked Joomla User
If this advertiser has a Joomla user account, you may link it here.
Once linked, the advertiser can access the WaypointAds Advertiser Dashboard (Commercial Edition) without requiring additional configuration.
Core Edition users can simply leave this field as No linked user.
6. Competitive Group (Commercial)
This feature is available only in WaypointAds Commercial.
Competitive Groups prevent competing advertisers from appearing together within the same advertising locations. For example, you may not want two competing automobile dealerships rotating in the same premium advertising space.
Core Edition users will see this field but cannot modify it.
7. Notes
Use this area to record anything helpful about the advertiser.
Typical notes might include:
- Preferred contact times
- Special advertising requests
- Contract reminders
- Billing information
- Internal comments
These notes are for administrators only and are never displayed publicly.
8. Status
Choose whether the Advertiser is currently Active or Inactive.
Inactive advertisers remain in the database but cannot have active campaigns until they are reactivated.
When everything looks correct, click Create Advertiser.
Your new Advertiser will immediately appear in the Existing Advertisers list on the right-hand side of the screen alongside the Learning Example and any advertisers you've already created.
What's next?
Every Advertiser eventually creates one or more Campaigns, and every Campaign contains one or more Creatives. In the next lesson, we'll create your first Campaign and see how these pieces begin working together.

WaypointAds is a modern advertising solution for Joomla that makes it easy to create campaigns, manage advertisers, organize creatives, and display ads across your website. Built for simplicity, flexibility, and growth, it gives you the tools to keep your advertising running smoothly from a single, intuitive interface.
