Creating Your First Campaign
- Details
Now that you've created your first Advertising Zone and Advertiser, it's time to create a Campaign.
A Campaign is the heart of WaypointAds. It connects an Advertiser to one or more Advertising Zones and contains the Creatives that will eventually appear on your website. Every advertisement displayed by WaypointAds belongs to a Campaign.
If you completed the Learning Setup, you'll already see the Grand Opening – Learning Campaign in the list on the right. This example demonstrates how a completed Campaign looks. You may leave it in place while learning, edit it, or remove it whenever you no longer need it.
Now let's create your own Campaign.
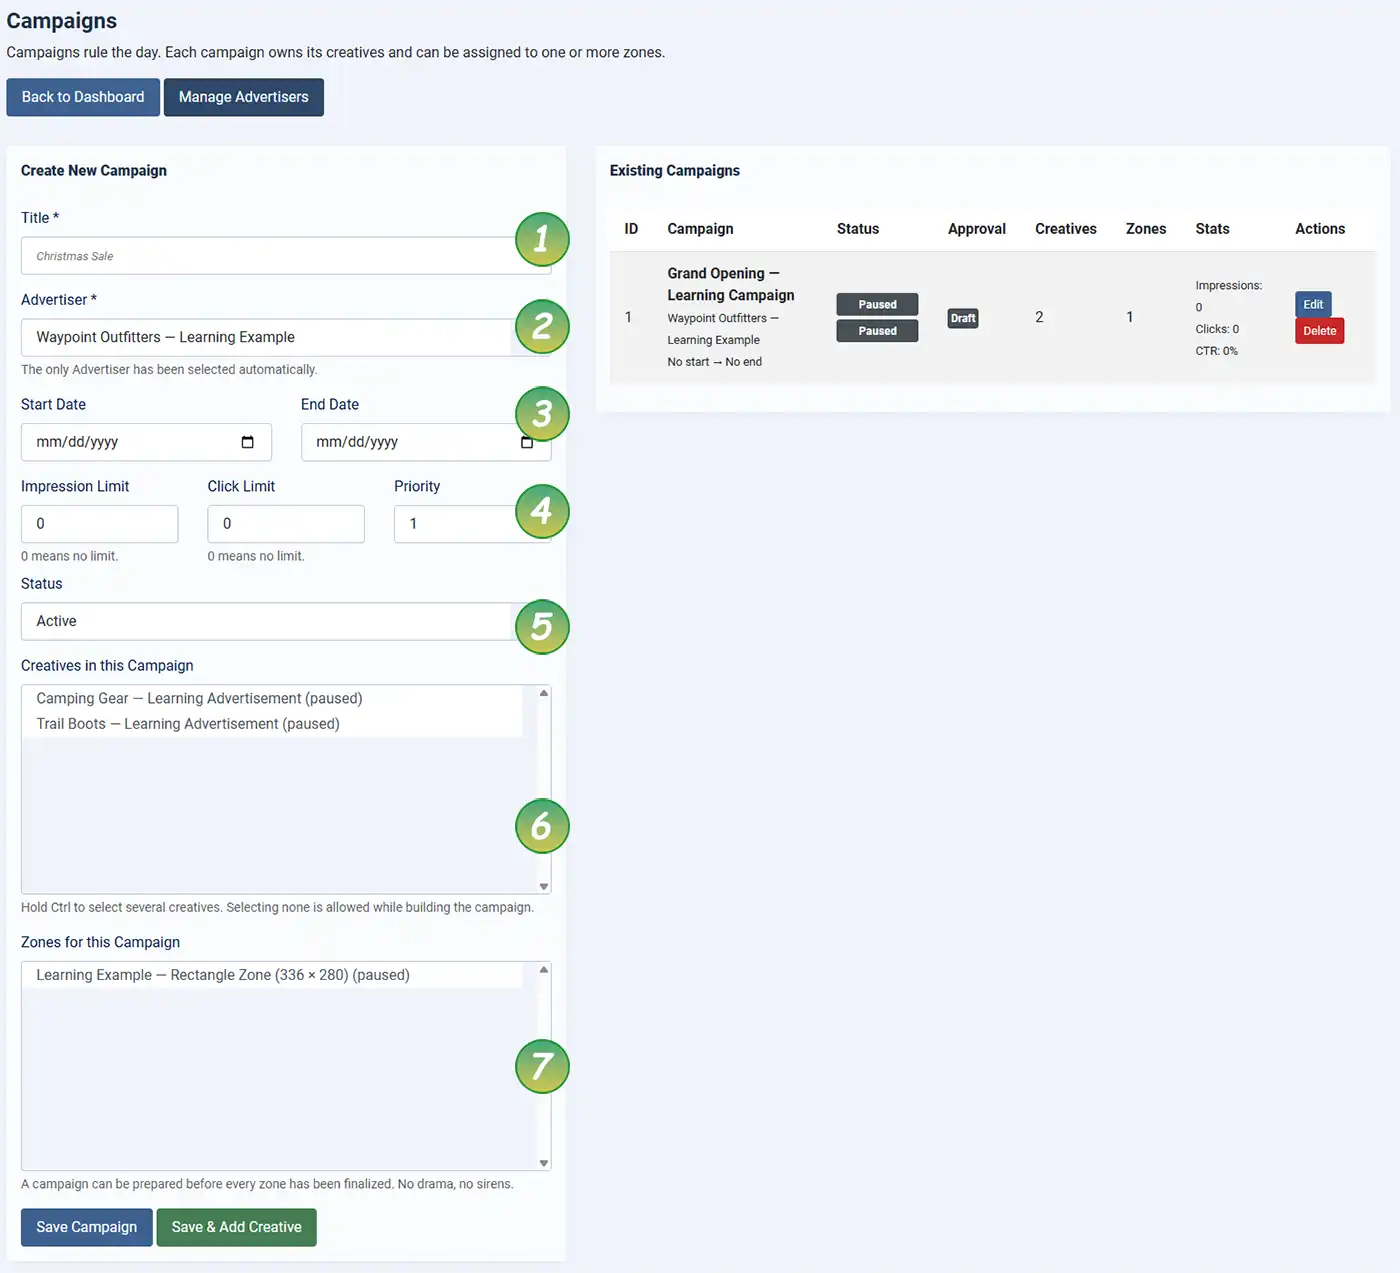
Complete the fields using the numbered guide.
1. Campaign Title
Give your Campaign a descriptive name.
Examples include:
- Summer Sale
- Christmas Promotion
- Homepage Banner Campaign
- New Product Launch
A clear title makes campaigns much easier to identify later.
2. Advertiser
Choose the Advertiser that owns this Campaign.
Every Campaign belongs to exactly one Advertiser. If only one Advertiser exists, WaypointAds will automatically select it for you.
3. Start Date and End Date
Optionally schedule when the Campaign should begin and finish.
You can:
- Leave both dates blank to run indefinitely.
- Specify a Start Date.
- Specify an End Date.
- Specify both dates for a scheduled campaign.
WayPointAds automatically starts and stops Campaigns according to these dates, so you don't have to remember to do it manually.
4. Impression Limit, Click Limit and Priority
These settings give you fine control over how your Campaign operates.
Impression Limit controls how many times advertisements may be displayed.
Click Limit determines how many clicks the Campaign may receive before stopping.
Entering 0 means there is no limit.
Priority determines how frequently this Campaign is selected when several eligible Campaigns compete for the same Zone. Higher priority campaigns are favored while still allowing normal rotation where appropriate.
5. Status
Choose whether the Campaign is Active or Paused.
Active Campaigns are eligible to display advertisements immediately, provided everything else is ready.
Paused Campaigns remain fully configured but will not display advertisements until reactivated.
6. Creatives in this Campaign
Select one or more Creatives that belong to this Campaign.
If you haven't created any Creatives yet, don't worry—you can leave this list empty for now.
Later, you'll learn how to create advertisements and assign them to existing Campaigns.
7. Zones for this Campaign
Choose one or more Advertising Zones where this Campaign may appear.
A Campaign can serve advertisements in multiple Zones, provided the Creatives are compatible with those Zones.
If you haven't finished creating all your Zones yet, simply select the ones that already exist. Additional Zones can be added later without rebuilding the Campaign.
Saving Your Campaign
When you've finished configuring the Campaign, you have two choices:
Save Campaign saves your work and returns you to the Campaign Manager.
Save & Add Creative immediately opens the Creative editor, allowing you to create your first advertisement without taking any extra steps.
For most first-time users, Save & Add Creative is the quickest way to continue building a complete advertising campaign.
 |
Why are Campaigns separate from Creatives? A Campaign can contain multiple Creatives, allowing advertisements to rotate automatically, be scheduled over time, or replaced without changing the Campaign itself. This separation makes managing advertising much easier as your site grows. |

WaypointAds is a modern advertising solution for Joomla that makes it easy to create campaigns, manage advertisers, organize creatives, and display ads across your website. Built for simplicity, flexibility, and growth, it gives you the tools to keep your advertising running smoothly from a single, intuitive interface.
